Showing posts with label How To. Show all posts

Thursday, 16 May 2013

How To Get Tons Of Genuine Likes On Instagram


So wanna get tons of likes on Instagram? You're at the right place. Today I'm going to reveal a secret of getting likes on Instagram. Well, It is not a hack or some cheap trick, The likes you'll get are 100% genuine and from real profiles. Not only that, People will like your photos themselves and you don't have to give anything in return. Some of you must be thinking that it is a joke but believe me, It isn't. 

get real instagram likes free

So coming back to the topic, You guys must be knowing about something known as "Tag" or "Hashtag", It looks like this #HashTag. Everybody uses tags to describe the photo they've uploaded, This makes Searching photos easier and whenever a guy will search for some similar query or tag, All the photos tagged with that particular tag will be displayed. Any time you can visit the tag to see all the photos tagged with it. In short tags helps in making photos easier to search and to get noticed. 

For example: 

If I upload a photo of a Car and post it without adding any tags, How will Instagram it is a car? If Instagram does not know anything thing about that photo then How can anyone search it? So you got the point?

If I again upload a photo of a Car and tag it with #Car, Now from the tag #Car, Instagram knows that it is a photo of car. Anyone who searches for 'Car' will see my photo.

How this Trick Works?
Actually it isn't a trick, It is just a smart move. We tag our photos with a list of Popular tags with thousands of photos. Since those tags are very popular, People visit them frequently and this increases the chances of them seeing your photo. So if you upload a photo with Most Popular and Common Tags then the chances of it getting noticed will increase tremendously and More people notice it, the higher likes you'll get. So it is Simple! isn't it?

So now you guys must be thinking, 'How will I get Popular Tags?', Don't worry, I've done the dirty job for you. In this post I will share Some of the most popular Instagram tags, which will help you in making your photos popular. I will also share some popular tags category wise, So that you can simply Copy-Paste them to your photos.

How to Use these Tags?

Well, It is simple. When uploading photos, Copy and Paste a group of tags in description area and done. Now you can simply post the image and see the likes counter going up ;)

Popular HashTags to Get Likes on Instagram

Below are some of the most popular tags for Instagram. You can choose them category wise or if you aren't able to decide the category then simply add the tags from Most Popular Tags category.

Please Note: Instagram only allows 30 Tags per photo, So be careful.

Most Popular Tags
#tweegram #picoftheday #photooftheday #instagood #me #instamood #cute #iphonesia #fashion #lol #summer #tbt #igers #picoftheday #food #instadaily #instagramhub #beautiful #girl   #bestoftheday #jj #sky #picstitch #follow #webstagram #sun #nofilter #happy #love #followme

To Get More Likes
#like #liking #like4like #superliker #liker  #l4l #likes4likes #photooftheday #love #likeforlike #likes #likesforlikes #liketeam #likeback #Area51blog #likebackteam #instagood #likeall #likealways #Likeme

To Get More Followers
#follow #following #pleasefollow #f4f #followme #justfollow #followforfollow #follow4follow #teamfollowback #followher #Area51blog #followhim #followall #followalways #followback #me #love  #follows #follower #followbackteam

Travel
#travel #travelling #traveling #vacation #instatravel #instago #instagood #trip #holiday #picoftheday #fun  #tourism #tourist #instapassport #instatraveling #mytravelgram #travelgram #travelingram #Area51blog #igtravel #voyage #instago #awesome #amazing #clouds #sunset #beach #bestoftheday #happy #smile

Food
#food #desserts #foodporn #yum #instafood  #yummy #amazing #instagood #sweet #dinner #lunch #breakfast #dessertporn  #icecream #tasty #Area51blog #food #delish #delicious #eating #foodpic #sweettooth #eat #hungry #foodgasm #hot #foods

Music
#music #genre #song #songs #melody #dubstep #instagood #beat #beats #muzik #jam #party #partymusic #newsong #lovethissong #remix #favoritesong #bestsong #Area51blog #bumpin #repeat #listentothis #goodmusic #instamusic #mymusic #hiphop #rnb #pop #love #rap

iPhone
#iphone #apple #iphonegraphy #appleiphone #ios #iphone3g #iphone3gs #iphone4 #iphone5 #technology #electronics #mobile #instagood #Area51blog #instaiphone #MyI #photooftheday #teamiphone #smartphone #iphoneography #iphoneonly  #iphoneographer #iphoneology #iphoneographers #iphonegraphic #iphoneogram  

Android
#android #androidnesia #androidonly #androidographer #google #googleandroid #droid #instandroid #instaandroid #instadroid #instagood #ics #jellybean #samsung #samsunggalaxys2 #samsunggalaxy #androidcommunity #smartphone #mobile #androidography #Area51blog #androidinstagram #teamdroid #teamandroid #Andro #samsunggalaxys3 #samsunggalaxys4 #s4 #galaxys4

So just use the above tags in the photo description and post it. I hope this helps you get more likes. Please let us know in the comments. If this post helped you then please share it with your friends on social networks, Don't forget to leave comments.

Saturday, 11 May 2013

Manage & Control Android Devices Wirelessly With AirDroid

AirDroid

We all love our smartphones and tablets, but sometimes there’s only so much you can do with the single screen view and limited screen size. Wouldn’t it be great to be able to manage all your data on your Android device like you could on the laptop? With AirDroid, you can.
AirDroid lets you connect your Android device with a desktop PC or laptop where you can thenaccess files, send/recieve SMS, install/uninstall apps, and manage bulks of data in your Android smartphone or tablet. Oh, and it lets you do this wirelessly.


Getting Started With AirDroid

In order to begin using AirDroid, you must ensure your desktop PC or laptop is on the same (wireless) network as your Android device. This is to link up your mobile device with your desktop PC or laptop.
On your Android device, go to Google Play and download and install AirDroid. Run the app.
On your desktop PC or laptop, navigate to web.airdroid.com or key in the IP address shown on your Android device.
AirDroid Web

Login To AirDroid

You can login by scanning the QR code or punching in a 6-digit code.
To enter via QR Code scan: tap the camera button in the AirDroid app. Scan the QR code shown on your browser.
To enter via passcode: input the 6-digit passcode you see on your Android device onto your web browser.
Passcode
Once you have successfully logged in, you’ll see icons, and other relevant information about your device. Your devices are now connected. Let’s get to work.
AirDroid Web Home

What You Can Do With AirDroid

After you have logged in, you can click on any of the icons to start managing and controlling your Android device from your desktop PC.
Here is the list of icons and a short description of what they do:
  • Messages – Create, receive or reply SMS messages.
  • Music – Manage and upload music content to your device.
  • Contacts – Manage and edit contact details.
  • Apps – Manage apps installed on your device or install an app with an APK file from your desktop.
  • Ringtones – Manage and upload phone, notification and alarm ringtones.
  • Frequent Contacts – Shows contacts you frequently communicate with.
  • Files – File explorer similar to exploring files when your device is plugged into your computer.
  • Videos – Manage, view and upload video files.
  • Screenshot – Take screenshots of your Android device (rooted devices only).
  • Call Logs – View or delete details of incoming, outgoing or missed calls.
  • Photos – Manage and upload photos on your Android device.

AirDroid Browser ‘Widgets’

There are more things you can do with widgets found on your browser, widgets like the Clipboardand URL Opener, and the Search Bar.
The clipboard allows you to control the clipboard of your device. This is good for transferring a long string of text or digits you may want to transfer from your computer to your device.
The URL opener opens the copied link on the default browser of your Android device.
Widgets
And lastly, the Search Bar lets you look for apps on the Play Store or on Quixey.
There are also 5 buttons on the right of the search bar which allow you to:
  1. Enable "multiple desktops" for better multitasking (see below)
  2. Compose a text message
  3. Install apps
  4. Upload files
  5. Return to the AirDroid main page.
Multiple Desktops
Once you’re done using AirDroid, you can tap the Disconnect button on your device and quit the app.

Tuesday, 7 May 2013

How to Embed Instagram Photos Gallery Into Your Blog


Instagram is an fabulous online app where you can share your photos with your friends and family. It was created by Kevin Systrom and Mike Krieger and launched in October 2010. Its not available in PC only on mobile. This online app enable users to take photo, apply digital filter to photo and share them into social networking site. This service quickly populated with over 100 million active users.

Currently Instagram isn't providing any option to embedding its photos into website and blog, so the instagram users have to turn into third-party plugin to get embed photo gallery into site/blog. There is an awesome website to create embed Instagram photos gallery.


Snap Widget is awesome widget generator site, which allow you to display a dynamically updated Instagram photo gallery on your website or blog. It can be in the design of grid layout or slide show or photo map that gives users the ability to explore the places you've Instagramed.


To get started goto SnapWidget website and to add this widget you can either use your Instagram username or an Instagram hashtag (for example #sports or #funny) to generate the widget. You can see plenty of cool option for more customization that you need to make the widget awesome. Fill up the form correctly and click Get widget button. Copy-paste provided code into your blog and enjoy it. If you are using blogger blog, then add the generated code into HTML/JavaScript.

This widget will automatically updates the latest Instagramed photos every 30 minutes. 

Wednesday, 24 April 2013

How To Delete / Erase Sensitive Files Permanently


Technically speaking when you hit the ‘Delete’ button attempting to remove any files from your computer, these files are not really removed from your hard disk. What the delete action does is un-link the file so it is not visible nor accessible. These deleted files have a high chance to be recovered with hard disk recovery softwares. So if you want some files to be really removed from your hard disk, you need something more than just deleting them.
Erasing, in the other hand means wiping its entire data beyond recovery. When you want to get rid of sensitive files or folders permanently, try this user friendly software – Eraser. It’s free so you don’t have to pay a penny

Erase Sensitive Files Permanently With Eraser

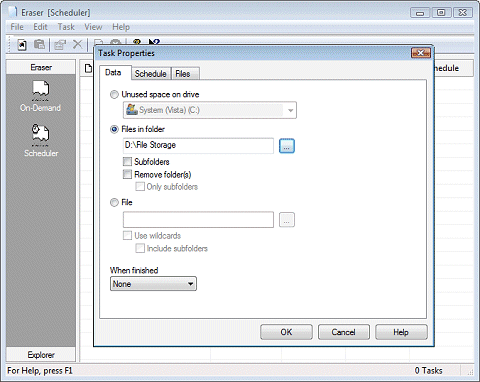
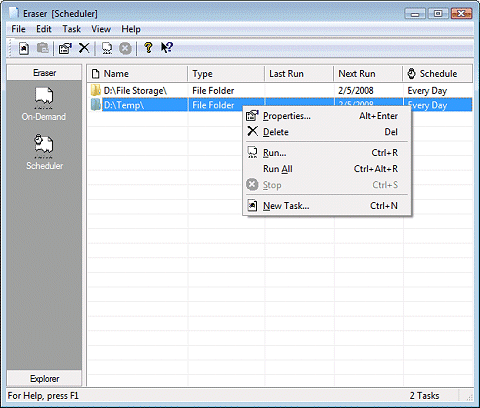
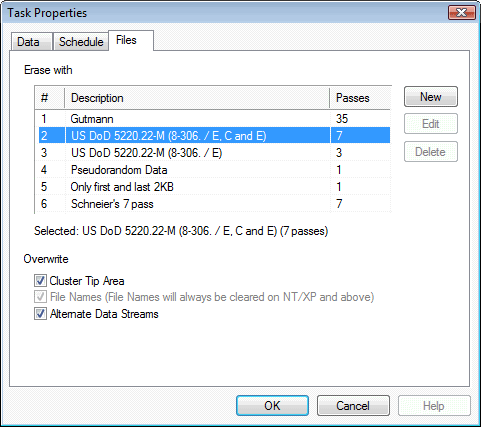
Eraser is a secure data removal tool that allows you to completely remove sensitive data from your hard drive by overwriting it several times with carefully selected patterns (Gutman, USDoD and others).
Eraser
Eraser
Eraser
What Eraser erases:
  • Files and Folders
  • Files/Folders that were only previously ‘deleted’
  • Index.dat on Reboot
  • Contents of the Recycle Bin
  • Windows Temporary Files
  • Internet Cookies and Cache
  • Encrypted Files and Drives
  • Free space on 95, 98, ME, NT, 2000, XP and DOS
  • Paging (swap) file
You can simply drag and drop files and/or folders onto the on-demand eraser and use the convenient Windows Explorer right-click extension or use the built-in scheduler for automated wiping of unused disk space or browser cache files.
*Be careful when execute this program because the erased file will be gone forever.
Download Eraser (8.53MB)

How To Encrypt Data Or Files


For the maximum security of files on your computer, it is essential to have a powerful encryption tool. A powerful encryption tool means it must at least provides several encryption algorithms and smart handling.
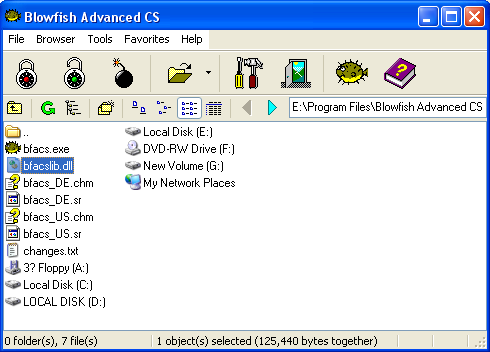
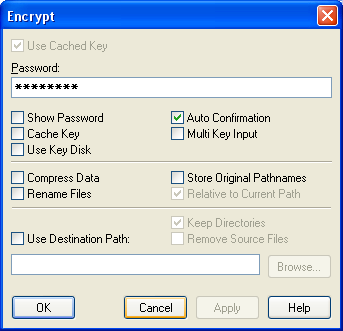
For this, Blowfish Advanced CS does a good job is cryptographic implementations. In short, Blowfish Advanced CS is a file-encryption solution which offers multiple algorithms, efficient data compression, and safe key handling for content protection.
Blowfish Advanced CS is an advance encryption tool but still very handy and user friendly. It actually encrypts megabytes of data per second and allows data compression at the same time.
So if you’re looking for a free encryption tool with powerful features, try Blowfish Advanced CS.


How To Perform Multiple Actions Automatically In Windows

WinMacro

[Windows only] Do you frequently perform the same set of actions/commands again and again in your daily job? If you agree with us that this is frustrating and it’s killing your motivation and efficiency, meet WinMacro.
In short, WinMacro is a FREE Macro recorder/player that monitors your mouse and keyboard events, then play them for you. It could be very useful to automate everyday tasks that you need to perform repetitively, so all you need to do, is pretty much clicking a button. Think of it as ‘Actions’ in Photoshop.

How To Use WinMacro

  1. Download and execute WinMacro.
  2. Type a filename to record. A file will be saved at the same directory with WinMacro program.
  3. Click “Record” button to start recording.
    winmacro_kay
  4. To stop recording, press the Pause/Break key. You may also use Ctrl+Esc or Ctrl+Alt+Del.
  5. To playback a recorded action, browse to select an existing file.
  6. Click “Playback” to playback from the file and WinMacro will minimize itself to the taskbar and starts playing back events from the file.
  7. After playback is over, WinMacro pops a message box indicating “Playback Over”.
  8. To interrupt playback midway, press Ctrl+Esc or Ctrl+Alt+Del
How to use WinMacro may varies from individual to individual, depending on personal preferences and styles but the bottom line is – it speed things up.

How To Setup Google Ad Manager On Your Blog/Website

Google Ad Manager

If you are generating revenue off your website or blog, chances are you serve banner ads and they are either updated manually by adding the images and URLs into the source codes or with the help of external ad-serving scripts like OpenX or OIO Publishers.
Google has a similar web service, call the Google Ad Manager. In a nutshell, it is a simple (and free) web service that helps you manage banner ads. It also comes with a pretty complete inventory report module. Ad Manager integrates with AdSense, therefore webmasters have the ability to serve AdSense ads if there’s no banner for any particular slot. Here’s a quick look into advantages ofGoogle Ad Manager:
  • Ad Targeting ability. You control who get to see the ads. Let it be geographical, browser or language specific.
  • Efficient ad serving. No script installation is required. Everything (including the creatives) are hosted with Google. Not only it saves you space and bandwidths, you can also be rest-assured that banners will be delivered quickly.
  • Multi-user supported. You can assign multiple salespersons to handle the sales part, and have everything documented/recorded nicely inside Google Ad Manager.
  • Simple User Interface. And like any other Google web services, Ad Manager has simple and easy to understand interface.
  • more..
If you are convinced that Google Ad Manager is potentially helpful in managing advertisements for your website or blog, we want to show you how to get it setup right from the scratch. Full guide after jump.

1. Create Ad Slots

Ad Slots are the reserved space on your site for ad placements. If you want to insert 4 125×125 banners on your sidebr, you are looking at creating 4 ad slots. Here hongkiat.com, we have eight 125×125 image banners. That means we’ll need to repeately create 8 different ad slots. Let’s go about doing it.
  1. Under Inventory -> Ad Slots, click on New Ad Slots.
  2. Compulsory fields: Give your slot an unique Ad slot name. Select the banner size drop drop down, or create one if you like. Choose if the banner should open a new window (_blank) or open on current window (_top) upon click.
  3. Optional fields: Checked the AdSense checkbox is you want to maximize revenue on the slot with AdSense, but we’ll recommend not to, for now. Fill in a meaningful description for the Ad Slot, or you can perhaps skip this if your Ad slot name is self-descriptive enough.
  4. Save it.
Repeat step 1, 2 and 3 to create all the ad slots you’ll need. For our case, we will be creating 8 ad slots with different name. Here’s how one of them look like.
And once you are done with creating all your ad slots, here’s how your Inventory page will look like. Next, we will be creating ad placements.

2. Create Ad Placements

Ad Placements are what hold/group your ad slots together. For hongkiat.com, since we have 8 ad slots of 125×125 banners on the sidebar, we’ll need one ad placement to hold them together. Ad placement also make sure each ad gets a fair shot of being on the top position if you set them on rotational. Here’s how you create ad placement.
  1. Under Inventory -> Placements, click on New Placement.
  2. Compulsory fields: Give your ad placement a meaningful name. For example, we name ours "HKC-125-RightTop-Zone" because it’s going to store all 125×125 banners, positioned at the top right corner of the blog.
  3. Optional fields: If you allow AdSense to bid for ad slots in this placement, check forTargeting, else uncheck. The Internal Description is personal use only, something to let you understand your ad placements better.
  4. Add all ad slots that belongs to this new ad placement you’ve created, in our case we added all.
  5. Save it.
Here’s a sample of how our Ad Placement settings look like.
Once saved your ad placement, you’ll be returned to Inventory -> Placements main page and it looks something like this.
Here’s a quick summary – You’ve created the necessary Ad Slots, and group them under a Ad Placement. The next thing we need to do is to add "real" banners into each of these ad slots.

3. Create Orders

Orders

Think of Orders as banner order requests. It stores information about who the advertisers are, the start and end date of the ad campaigns, and more. If an advertise place an order of banner ad on your website, you create a new Order. If you have 8 Ad Slots, expect to create up to 8 different Orders. Make sense? Let’s create some Orders.
  1. Under Orders, click on New Order.
  2. Compulsory fields: Give each other an Order name and External ID you can easily regconized. Let the system know when the banner will start and when it’ll end by choosing theStart date and End date. Choose unlimited if it’s likely to be permanent.
  3. Optional fields: You might also want to fill up the AdvertiserAgencyContactsUser Assignments and Notes to help you understand the Order better.
  4. Save it.
We’ll now create a Line item for this order.

Line Items

Line Items associate with Orders. Every time an Order is entered, you’ll need to create a Line Item for it. Line item allows you to determine the nature of the ad, whether it’s serving as CPC, CPM or CPD.You also set the cost/price for the ad here.
Everytime you hit the Save button after creating an Order, you’ll be directed to create a Line item.
  1. Click New line items.
  2. Give it a Name.
  3. Determine the Delivery Priority. If your order is a direct ad, change to Exclusive from the drop down box so you can use CPD (Cost per Day).
  4. Again, you need to make sure you’ve correctly entered the Start date and End date.
  5. Under Placement section, associate Line Item with it’s respective placement.
  6. Targetting section allows you to control who should see the ad. In another words, under what condition the ad will appear on your website. This setting is optional, by default ad will be visible to all.
  7. Delivery Options section detemine the appearance of the ad. Set Delivery rate and Creative rotation to Even will ensure all your orders get equal impressions.
  8. Save it.
Here’s how your line item will look like.
A quick recap before we continue. We’ve created an Order, with advertiser information, campaign start date and end date. Then we created Line Item for the Order where it stores information like cost type (CPC, CPM, CPD), cost, targetting behavours, etc. The next thing we need to do is to addcreative for the ad.

Creatives

Creatives are images of the ads. Every time a Line Item is added, you’ll need to add (and approve) at least one creative for it.
  1. After saving a Line item, click on need creatives to add an image for the ad.
  2. Fill up the NameAd slot size (banner size), Creative typeManual Weight (if you need to control the priority of banner rotations)
  3. Save it.
Creative type determines how you serve the banner image. Google Ad Manager is capable of hosting your banners internally (regardlessly of jpg, flash, gif or png) or you can host them elsewhere and insert the image URL. Use rich media if you need manual HTML codes insertion.
Here’s a sample of how creative upload page should be filled.
Remember to Approve and activate the creative.
Repeat all steps in OrdersLine Items and Creatives for every individual banners. In our case, we will repeat this 8 times to fill up all our ad slots.

4. Display Banners

Here’s our final step before ads start showing on our website – generate the codes and paste them inside our source codes.
  1. Go to Inventory -> Ad Slots, click on Generate Sample HTML.
  2. Add all slots needed to Selected Items section
  3. Click Generate Sample HTML
Scroll to the bottom to find your generated codes. It should look something like this:
  1. <html><br>  
  2. <head><br>  
  3. <!-- PUT THIS TAG IN THE head SECTION --><br>  
  4. <script type="text/javascript" src="http://partner.googleadservices.com/gampad/google_service.js<br>  
  5. </script><br>  
  6. <script type="text/javascript"><br>  
  7. GS_googleAddAdSenseService("ca-pub-8918970543424762");<br>  
  8. GS_googleEnableAllServices();<br>  
  9. </script><br>  
  10. <script type="text/javascript"><br>  
  11. GA_googleAddSlot("ca-pub-8918970543424762", "HKC-125A1");<br>  
  12. GA_googleAddSlot("ca-pub-8918970543424762", "HKC-125A2");<br>  
  13. GA_googleAddSlot("ca-pub-8918970543424762", "HKC-125A3");<br>  
  14. GA_googleAddSlot("ca-pub-8918970543424762", "HKC-125A4");<br>  
  15. GA_googleAddSlot("ca-pub-8918970543424762", "HKC-125A5");<br>  
  16. GA_googleAddSlot("ca-pub-8918970543424762", "HKC-125A6");<br>  
  17. GA_googleAddSlot("ca-pub-8918970543424762", "HKC-125A7");<br>  
  18. GA_googleAddSlot("ca-pub-8918970543424762", "HKC-125A8");<br>  
  19. </script><br>  
  20. <script type="text/javascript"><br>  
  21. GA_googleFetchAds();<br>  
  22. </script><br>  
  23. <!-- END OF TAG FOR head SECTION --><br>  
  24. </head><br>  
  25. <body><br>  
  26. <p>Sample Text before slot HKC-125A1<br>  
  27. </p><br>  
  28. <!-- PUT THIS TAG IN DESIRED LOCATION OF SLOT HKC-125A1<br> 
  29. --><br>  
  30. <script type="text/javascript"><br>  
  31. GA_googleFillSlot("HKC-125A1");<br>  
  32. </script><br>  
  33. <!-- END OF TAG FOR SLOT HKC-125A1<br> 
  34. --><br>  
  35. <p>Sample Text before slot HKC-125A2<br>  
  36. </p><br>  
  37. <!-- PUT THIS TAG IN DESIRED LOCATION OF SLOT HKC-125A2<br> 
  38. --><br>  
  39. <script type="text/javascript"><br>  
  40. GA_googleFillSlot("HKC-125A2");<br>  
  41. </script><br>  
  42. <!-- END OF TAG FOR SLOT HKC-125A2<br> 
  43. --><br>  
  44. <p>Sample Text before slot HKC-125A3<br>  
  45. </p><br>  
  46. <!-- PUT THIS TAG IN DESIRED LOCATION OF SLOT HKC-125A3<br> 
  47. --><br>  
  48. <script type="text/javascript"><br>  
  49. GA_googleFillSlot("HKC-125A3");<br>  
  50. </script><br>  
  51. <!-- END OF TAG FOR SLOT HKC-125A3<br> 
  52. --><br>  
  53. <p>Sample Text before slot HKC-125A4<br>  
  54. </p><br>  
  55. <!-- PUT THIS TAG IN DESIRED LOCATION OF SLOT HKC-125A4<br> 
  56. --><br>  
  57. <script type="text/javascript"><br>  
  58. GA_googleFillSlot("HKC-125A4");<br>  
  59. </script><br>  
  60. <!-- END OF TAG FOR SLOT HKC-125A4<br> 
  61. --><br>  
  62. <p>Sample Text before slot HKC-125A5<br>  
  63. </p><br>  
  64. <!-- PUT THIS TAG IN DESIRED LOCATION OF SLOT HKC-125A5<br> 
  65. --><br>  
  66. <script type="text/javascript"><br>  
  67. GA_googleFillSlot("HKC-125A5");<br>  
  68. </script><br>  
  69. <!-- END OF TAG FOR SLOT HKC-125A5<br> 
  70. --><br>  
  71. <p>Sample Text before slot HKC-125A6<br>  
  72. </p><br>  
  73. <!-- PUT THIS TAG IN DESIRED LOCATION OF SLOT HKC-125A6<br> 
  74. --><br>  
  75. <script type="text/javascript"><br>  
  76. GA_googleFillSlot("HKC-125A6");<br>  
  77. </script><br>  
  78. <!-- END OF TAG FOR SLOT HKC-125A6<br> 
  79. --><br>  
  80. <p>Sample Text before slot HKC-125A7<br>  
  81. </p><br>  
  82. <!-- PUT THIS TAG IN DESIRED LOCATION OF SLOT HKC-125A7<br> 
  83. --><br>  
  84. <script type="text/javascript"><br>  
  85. GA_googleFillSlot("HKC-125A7");<br>  
  86. </script><br>  
  87. <!-- END OF TAG FOR SLOT HKC-125A7<br> 
  88. --><br>  
  89. <p>Sample Text before slot HKC-125A8<br>  
  90. </p><br>  
  91. <!-- PUT THIS TAG IN DESIRED LOCATION OF SLOT HKC-125A8<br> 
  92. --><br>  
  93. <script type="text/javascript"><br>  
  94. GA_googleFillSlot("HKC-125A8");<br>  
  95. </script><br>  
  96. <!-- END OF TAG FOR SLOT HKC-125A8<br> 
  97. --><br>  
  98. </body><br>  
  99. </html>  
Follow the instructions stated in comments to insert the codes into their respective <head> and<body> sections.
Note: To prevent errors and avoid messing up the live site, it’s good that you copy the generated codes, paste it on a blank HTML to test the output. If the ads do not show up, chances are yourcurrent time is not yet the start date set in Orders and Line Items.
It’s done! You are now managing your website banners with Google Ad Manager. Login again few days later to check on the performance.
For any other questions, drop a comment, I’ll try my best to help.